Netmon 7.0 Quick Deployment Guide
The Netmon Deployment Guide will walk you through the process of installing and configuring a Netmon unit for network monitoring purposes. This guide includes step-by-step instructions for unboxing and racking the unit, connecting it to your network, accessing the unit, and configuring essential system settings.
Unboxing and Racking
- Unpack the Netmon unit carefully from the shipping box, ensuring you don’t accidentally damage any components. Keep the packaging materials in case you need to return the unit in the future.
- Install the provided rails into your server rack. Follow the manufacturer’s instructions for proper rail installation. If you are unsure, consult the rack manual or contact the manufacturer.
- Slide the Netmon unit into the server rack, aligning it with the rails. Ensure that the unit is secure and level within the rack.
- Use the provided screws to fasten the Netmon unit securely in the rack. Double-check that the screws are tightened appropriately to avoid any potential damage to the unit.
- ** You will find a sticker on the appliance with a MAC address and the default system password. Please make note of this password at this time.
For Netmon Jr.
** Prior to shipping Port 1 will be configured for DHCP and Port 2 configued to sniff traffic. There will be a sticker with the passwords. Proceed to ‘Accessing Netmon’.
Physical Networking
- Connect an Ethernet cable from the Netmon unit’s Interface 1 port to an available port on your network switch or router.
- *This connection will provide the unit with network access.
- Connect a separate Ethernet cable from the Netmon unit’s IPMI (Intelligent Platform Management Interface) or OOBM (Out-of-Band Management) port to another available port on your network switch or router.
- *This connection enables emergency and recovery management of the unit.
- (Optional) At this time, you may also connect an Ethernet cable from the Netmon (any available port) to the SPAN or MIRROR port of your network switch. This will allow real-time traffic analysis.
Accessing Netmon
If you are connected to the same subnet as Netmon, you may attempt to utilize mDNS by connecting to https://netmon.local.
Netmon can also be accessed by connecting to its IP address, from your DHCP server, using https://<IP.OF.NET.MON>.
DEFAULT LOGIN:
username (admin) and password (netmon).
Setup the Admin Account
Using the Left Navigation Menu, go to System > Users and Permissions to configure the admin account settings.
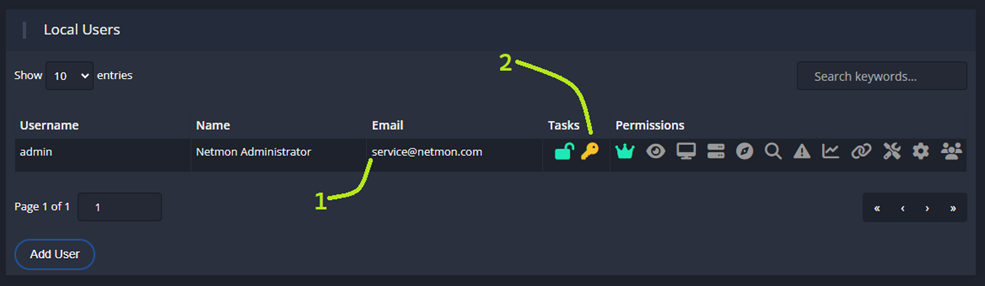
- Set the admin email address, which will be used to verify SMTP configuration.
- Reset the default admin password by clicking the key, and entering a new, secure password.
* Remember to store this password in a secure location or password manager.
Configure Netmon System Settings
Network Interfaces
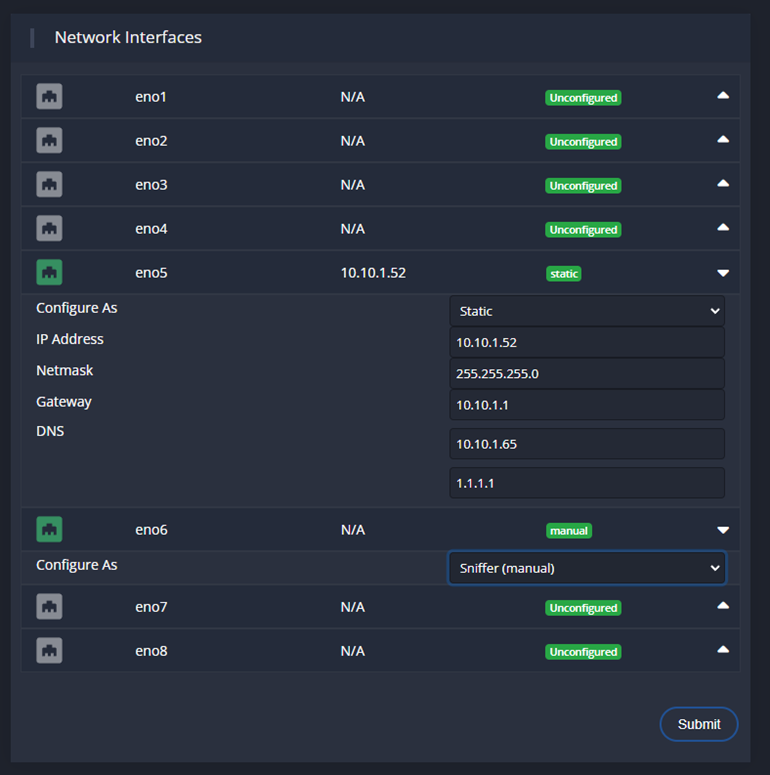
- Interfaces where connectivity is detected will be green
- To configure an interface, click it.
- Configure as has 4 options:
- Static IP: Configure all settings yourself.
- DHCP: Discover from DHCP server.
- Sniffer: This interface will be connected to a SPAN/Mirror port.
- Unconfigured: No configuration will be applied at boot.
- Click ‘Submit’ to save your changes.
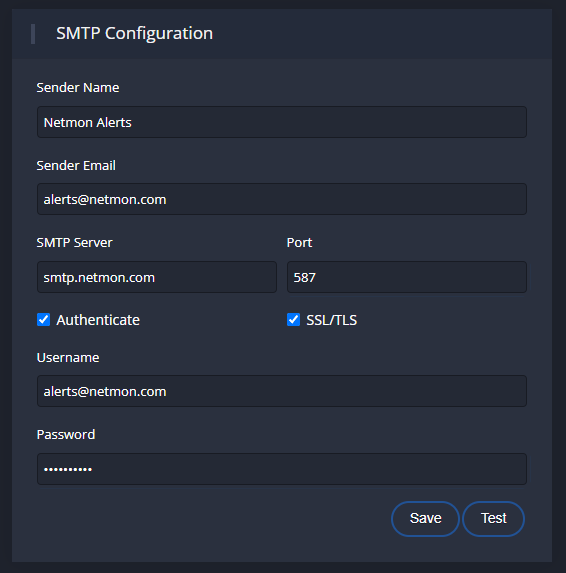
SMTP
Enter the required SMTP server information
such as the server address, port,
and authentication credentials.
Time and Timezone
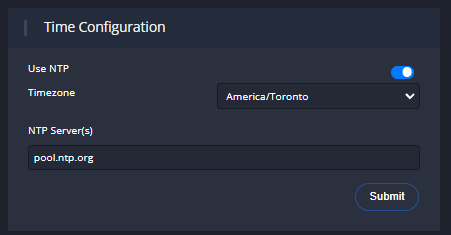
- Set the most appropriate timezone for your location.
- Configure the NTP server settings
- or, set the time manually if desired.
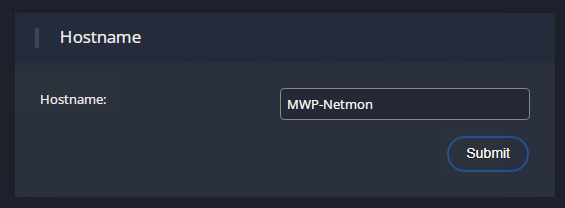
Hostname
- Enter a suitable hostname for your Netmon.
- Click Submit to apply.
Backup Private Key

Download and then delete PRIVATE_KEY
*This key is the master decryption key for the netmon database; please take care to store it, it is necessary to have this key to completely restore from backups